前言
最近小组里面引进了Spock这个测试框架,本人在实际使用了之后,体验非常不错,本篇文章一是为了巩固输入的知识,二是为了向大家推广一下。
在了解学习Spock测试框架之前,我们应该先关注单元测试本身,了解我们常见的单测痛点,这样才能更好地去了解Spock这个测试框架是什么,我们为什么要使用它,能解决我们什么痛点。
现在让我们开始吧。
关于单元测试
我们写代码免不了要测试,测试有很多种,对于Javaer们来说,最初级的测试是写个main函数运行一个函数结果,或者说把系统启起来自己模拟一下请求,看输入输出是否符合预期,更高级地,会用各种测试套件,测试系统。每个测试都有它的关注点,比如测试功能是否正确,系统性能瓶颈等等。
那我们常说的单元测试呢?
单元测试(英语:Unit Testing)又称为模块测试,是针对程序模块(软件设计的最小单位)来进行正确性检验的测试工作。程序单元是应用的最小可测试部件。在过程化编程中,一个单元就是单个程序、函数、过程等;对于面向对象编程,最小单元就是方法,包括基类(超类)、抽象类、或者派生类(子类)中的方法。
-- 摘自维基百科
以上是维基百科的说明。
单元测试当然不是必须之物,没了单测你的程序经过QA团队的端到端测试和集成测试之后,也能保证正确性。但是从另外的角度来看,单元测试也是必须之物。比如持续部署的前提之一就是有单元测试的保障,还有在重构代码的时候,没有单元测试你会寸步难行。
1.1 单元测试的好处
单元测试的好处包括但不限于:
·提升软件质量
优质的单元测试可以保障开发质量和程序的鲁棒性。越早发现的缺陷,其修复的成本越低。
· 促进代码优化
单元测试的编写者和维护者都是开发工程师,在这个过程当中开发人员会不断去审视自己的代码,从而(潜意识)去优化自己的代码。
· 提升研发效率
编写单元测试,表面上是占用了项目研发时间,但是在后续的联调、集成、回归测试阶段,单测覆盖率高的代码缺陷少、问题已修复,有助于提升整体的研发效率。
· 增加重构自信
代码的重构一般会涉及较为底层的改动,比如修改底层的数据结构等,上层服务经常会受到影响;在有单元测试的保障下,我们对重构出来的代码会多一份底气。
1.2 单元测试的基本原则
宏观上,单元测试要符合 AIR 原则:
A: Automatic(自动化)
I: Independent(独立性)
R: Repeatable(可重复)
微观上,单元测试代码层面要符合 BCDE 原则:
B: Border,边界性测试,包括循环边界、特殊取值、特殊时间点、数据顺序等
C: Correct,正确的输入,并且得到预期的结果**
D: Design,与设计文档相符合,来编写单元测试
E: Error,单元测试的目的是为了证明程序有错,而不是证明程序无错。为了发现代码中潜藏的错误,我们需要在编写测试用例时有一些强制的错误输入(如非法数据、异常流程、非业务允许输入等)来得到预期的错误结果。
1.3 单元测试的常见场景
开发前写单元测试,通过测试描述需求,由测试驱动开发。(如果不熟悉TDD的同学可以去google一下)
在开发过程中及时得到反馈,提前发现问题。
应用于自动化构建或持续集成流程,对每次代码修改做回归测试。(CI/CD 质量保障)
作为重构的基础,验证重构是否可靠。
1.4 单元测试的常见痛点
下列痛点是日常开发中可能会遇到的,
测试上下文依赖外部服务(如数据库服务)
测试上下文存在代码依赖(如框架等)
单元测试难以维护和理解(语义不清)
对于多场景不同输入输出的函数,单元测试代码量会很多
...
对上面几点稍微做下解释。
首先,测试代码的代码量绝对不会比业务代码少(假设有覆盖率指标,且不作弊),有时候一个函数,输入和输出会有多种情况,想要完全覆盖,代码量只会更多。较多的代码量,加上单测代码并不想业务代码那样直观(靠写注释的方式,看的乱,写的累),还有一部分编码人员对代码可读性不重视,最终就会导致单元测试的代码难以阅读,更难以维护。同时,大部分单元测试的框架都对代码有很强的侵入性,要想理解单元测试,首先得学习一下那个单元测试框架。从这个角度来看,维护的难度又增加了。
再说说,单元测试存在外部依赖的情况,也就是第一、二点,想要写一个纯粹的无依赖的单元测试往往很困难,比如依赖了数据库,依赖了其他模块,所以很多人在写单元测试时选择依赖一部分资源,比如在本机启动一个数据库。这类所谓的“单元测试”往往很流行,但是对于多人合作的项目,这类测试却经常容易造成混乱。 比如说要在本地读个文件,或者连接某个数据库,其他修改代码的人(或者持续集成系统中)并没有这些东西,所以测试也都没法通过。最后大部分这类测试代码的下场都是用不了、也舍不得删,只好被注释掉,扔在那里。随着开源项目逐渐发展,对外部资源的依赖问题开始可以通过一些测试辅助工具解决,比如使用内存型数据库H2代替连接实际的测试数据库,不过能替代的资源类型始终有限。
而实际工作过程中,还有一类难以处理的依赖问题:代码依赖。比如一个对象的方法中调用了其它对象的方法,其它对象又调用了更多对象,最后形成了一个无比巨大的调用树。后来出现了一些mock框架,比如java的JMockit、EasyMock,或者Mockito。利用这类框架可以相对比较轻松的通过mock方式去做假设和验证,相对于之前的方式有了质的飞跃。
但是,在这里需要强调一个观点,写单元测试的难易程度跟代码的质量关系最大,并且是决定性的。项目里无论用了哪个测试框架都不能解决代码本身难以测试的问题。
简单来说,有时候你觉得你的代码很难写单元测试,说明代码写的不是很好,需要去关注代码的逻辑抽象设计是否合理,一步步去重构你的代码,让你的代码变得容易测试。但这些又属于代码重构方面的知识了,涉及到很多的设计原则。推荐阅读《重构-改善既有代码的设计》《修改代码的艺术》 《敏捷软件开发:原则、模式与实践》这几本著作。
1.5 心态的转变
很多开发人员对待单元测试,存在心态上的障碍:
· 那是测试同学干的事情。(开发人员要做好单元测试
· 单元测试代码是多余的。 (汽车的整体功能与各单元部件的测试正常与否是强相关
· 单元测试代码不需要维护。 一年半载后,那么几乎处于废弃状态(单元测试代码是需要随着项目开发一直维护的
· 单元测试与线上故障没有辩证关系。(好的单元测试能最大限度规避线上故障
关于Spock
Spock能给你提供整个测试生命周期中可能需要的所有测试工具。它带有内置的模拟打桩,以及专门为集成测试创建的一些额外的测试注释。同时,由于Spock是较新的测试框架,因此它有时间观察现有框架的常见缺陷,并加以解决或提供更优雅的解决方法。

· Spock是Java和Groovy应用程序的测试和规范框架
· 测试代码使用基于groovy语言扩展而成的规范说明语言(specification language)
· 通过junit runner调用测试,兼容绝大部分junit的运行场景(ide,构建工具,持续集成等)
Groovy
· 以“扩展JAVA”为目的而设计的JVM语言
· JAVA开发者友好
· 可以使用java语法与API
· 语法精简,表达性强
· 典型应用:jenkins, elasticsearch, gradle
specification language
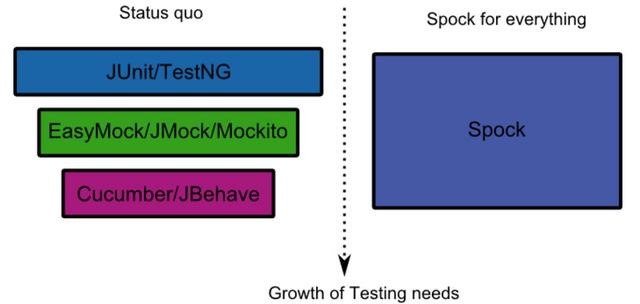
specification 来源于近期流行起来写的BDD(Behavior-driven development 行为驱动测试)。在TDD的基础上,通过测试来表达代码的行为。通过某种规范说明语言去描述程序“应该”做什么,再通过一个测试框架读取这些描述、并验证应用程序是否符合预期。把需求转化成Given/When/Then的三段式,所以你看到测试框架有这种Given/When/Then三段式语法的,一般来说背后都是BDD思想,比如上图中的Cucumber和JBehave。
Spock快速使用
现在让我们以最快速的方式,来使用一次Spock。
3.0 创建一个空白项目
创建一个空白项目:spock-example,选择maven工程。
3.1 依赖
<dependencies>
<!-- Mandatory dependencies for using Spock -->
<!-- 使用Spock必须的依赖 -->
<dependency>
<groupId>org.spockframework</groupId>
<artifactId>spock-core</artifactId>
<version>1.3-groovy-2.5</version>
<scope>test</scope>
</dependency>
<!-- Optional dependencies for using Spock -->
<!-- 选择性使用的Spock相关依赖 -->
<dependency> <!-- use a specific Groovy version rather than the one specified by spock-core -->
<!-- 不使用Spock-core中定义的Groovy版本,而是自己定义 -->
<groupId>org.codehaus.groovy</groupId>
<artifactId>groovy-all</artifactId>
<version>2.5.7</version>
<type>pom</type>
</dependency>
<dependency> <!-- enables mocking of classes (in addition to interfaces) -->
<!-- mock 接口和类时要用 -->
<groupId>net.bytebuddy</groupId>
<artifactId>byte-buddy</artifactId>
<version>1.9.3</version>
<scope>test</scope>
</dependency>
<dependency> <!-- enables mocking of classes without default constructor (together with CGLIB) -->
<!-- mock 类要用 -->
<groupId>org.objenesis</groupId>
<artifactId>objenesis</artifactId>
<version>2.6</version>
<scope>test</scope>
</dependency>
<dependency> <!-- only required if Hamcrest matchers are used -->
<!-- Hamcrest 是一个用于编写匹配对象的框架,如果用到了Hamcrest matchers,需要加这个依赖 -->
<groupId>org.hamcrest</groupId>
<artifactId>hamcrest-core</artifactId>
<version>1.3</version>
<scope>test</scope>
</dependency>
<!-- Dependencies used by examples in this project (not required for using Spock) -->
<dependency>
<groupId>com.h2database</groupId>
<artifactId>h2</artifactId>
<version>1.4.197</version>
<scope>test</scope>
</dependency>
</dependencies>
3.2 插件
<plugins>
<!-- Mandatory plugins for using Spock -->
<!--使用Spock的强制性插件 -->
<plugin>
<!-- The gmavenplus plugin is used to compile Groovy code. To learn more about this plugin,visit https://github.com/groovy/GMavenPlus/wiki -->
<!-- 这个 gmavenplus 插件是用于编译Groovy代码的 . 想获取更多此插件相关信息,visit https://github.com/groovy/GMavenPlus/wiki -->
<groupId>org.codehaus.gmavenplus</groupId>
<artifactId>gmavenplus-plugin</artifactId>
<version>1.6</version>
<executions>
<execution>
<goals>
<goal>compile</goal>
<goal>compileTests</goal>
</goals>
</execution>
</executions>
</plugin>
<!-- Optional plugins for using Spock -->
<!-- 选择性使用的Spock相关插件-->
<!-- Only required if names of spec classes don't match default Surefire patterns (`*Test` etc.) -->
<!--只有当测试类不匹配默认的 Surefire patterns (`*Test` 等等.)-->
<plugin>
<artifactId>maven-surefire-plugin</artifactId>
<version>2.20.1</version>
<configuration>
<useFile>false</useFile>
<includes>
<include>**/*Test.java</include>
<include>**/*Spec.java</include>
</includes>
</configuration>
</plugin>
...
</plugins>
3.3 设计测试源码目录
由于spock是基于groovy语言的,所以需要创建groovy的测试源码目录:首先在test目录下创建名为groovy的目录,之后将它设为测试源码目录。

3.4 编写待测试类
/**
* @author Richard_yyf
* @version 1.0 2019/10/1
*/
public class Calculator {
public int size(String str){
return str.length();
}
public int sum(int a, int b) {
return a + b;
}
}
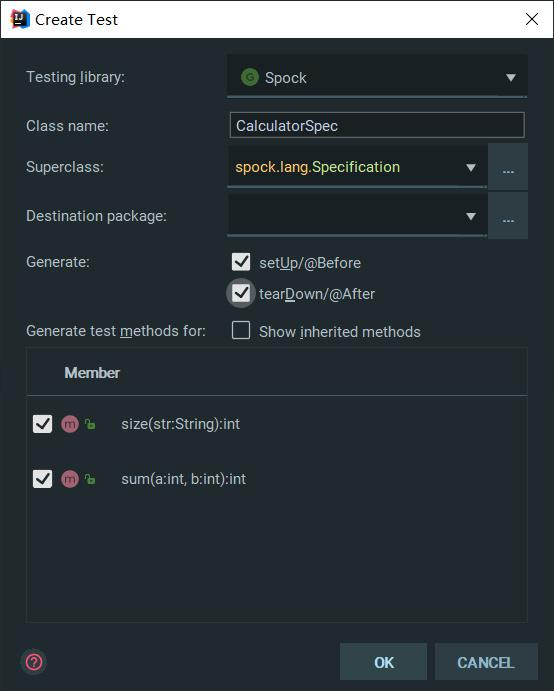
3.5 创建测试类
Ctrl + Shift + T

import spock.lang.Specification
import spock.lang.Subject
import spock.lang.Title
import spock.lang.Unroll
/**
*
* @author Richard_yyf
* @version 1.0 2019/10/1
*/
@Title("测试计算器类")
@Subject(Calculator)
class CalculatorSpec extends Specification {
def calculator = new Calculator()
void setup() {
}
void cleanup() {
}
def "should return the real size of the input string"() {
expect:
str.size() == length
where:
str | length
"Spock" | 5
"Kirk" | 4
"Scotty" | 6
}
// 测试不通过
def "should return a+b value"() {
expect:
calculator.sum(1,1) == 1
}
// 不建议用中文哦
@Unroll
def "返回值为输入值之和"() {
expect:
c == calculator.sum(a, b)
where:
a | b | c
1 | 2 | 3
2 | 3 | 5
10 | 2 | 12
}
}
3.6 运行测试

3.7 模拟依赖
这里模拟一个缓存服务作为例子。
/**
* @author Richard_yyf
* @version 1.0 2019/10/2
*/
public interface CacheService {
String getUserName();
}
public class Calculator {
private CacheService cacheService;
public Calculator(CacheService cacheService) {
this.cacheService = cacheService;
}
public boolean isLoggedInUser(String userName) {
return Objects.equals(userName, cacheService.getUserName());
}
...
}
测试类
class CalculatorSpec extends Specification {
// mock对象
// CacheService cacheService = Mock()
def cacheService = Mock(CacheService)
def calculator
void setup() {
calculator = new Calculator(cacheService)
}
def "is username equal to logged in username"() {
// stub 打桩
cacheService.getUserName(*_) >> "Richard"
when:
def result = calculator.isLoggedInUser("Richard")
then:
result
}
...
}
运行测试:

Spock 深入
在Spock中,待测系统(system under test; SUT) 的行为是由规格(specification) 所定义的。在使用Spock框架编写测试时,测试类需要继承自Specification类。命名遵循Java规范。
Spock 基础结构
每个测试方法可以直接用文本作为方法名,方法内部由given-when-then的三段式块(block)组成。除此以外,还有and、where、expect等几种不同的块。
@Title("测试的标题")
@Narrative("""关于测试的大段文本描述""")
@Subject(Adder) //标明被测试的类是Adder
@Stepwise //当测试方法间存在依赖关系时,标明测试方法将严格按照其在源代码中声明的顺序执行
class TestCaseClass extends Specification {
@Shared //在测试方法之间共享的数据
SomeClass sharedObj
def setupSpec() {
//TODO: 设置每个测试类的环境
}
def setup() {
//TODO: 设置每个测试方法的环境,每个测试方法执行一次
}
@Ignore("忽略这个测试方法")
@Issue(["问题#23","问题#34"])
def "测试方法1" () {
given: "给定一个前置条件"
//TODO: code here
and: "其他前置条件"
expect: "随处可用的断言"
//TODO: code here
when: "当发生一个特定的事件"
//TODO: code here
and: "其他的触发条件"
then: "产生的后置结果"
//TODO: code here
and: "同时产生的其他结果"
where: "不是必需的测试数据"
input1 | input2 || output
... | ... || ...
}
@IgnoreRest //只测试这个方法,而忽略所有其他方法
@Timeout(value = 50, unit = TimeUnit.MILLISECONDS) // 设置测试方法的超时时间,默认单位为秒
def "测试方法2"() {
//TODO: code here
}
def cleanup() {
//TODO: 清理每个测试方法的环境,每个测试方法执行一次
}
def cleanupSepc() {
//TODO: 清理每个测试类的环境
}
Feature methods
是Spock规格(Specification)的核心,其描述了SUT应具备的各项行为。每个Specification都会包含一组相关的Feature methods:
def "should return a+b value"() {
expect:
calculator.sum(1,1) == 1
}
blocks
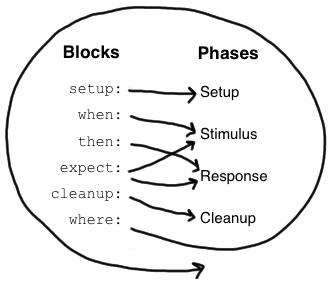
每个feature method又被划分为不同的block,不同的block处于测试执行的不同阶段,在测试运行时,各个block按照不同的顺序和规则被执行,如下图:

Setup Blocks
setup也可以写成given,在这个block中会放置与这个测试函数相关的初始化程序,如:
def "is username equal to logged in username"() {
setup:
def str = "Richard"
// stub 打桩
cacheService.getUserName(*_) >> str
when:
def result = calculator.isLoggedInUser("Richard")
then:
result
}
When and Then Blocks
when与then需要搭配使用,在when中执行待测试的函数,在then中判断是否符合预期。
Expect Blocks
expect可以看做精简版的when+then,如
when:
def x = Math.max(1, 2)
then:
x == 2
码简化成
expect:
Math.max(1, 2) == 2
断言
条件类似junit中的assert,就像上面的例子,在then或expect中会默认assert所有返回值是boolean型的顶级语句。如果要在其它地方增加断言,需要显式增加assert关键字
异常断言
如果要验证有没有抛出异常,可以用thrown()
def "peek"() {
when: stack.peek()
then: thrown(EmptyStackException)
}
如果要验证没有抛出某种异常,可以用notThrown()
Mock
Mock 是描述规范下的对象与其协作者之间(强制)交互的行为。
1 * subscriber.receive("hello")
| | | |
| | | argument constraint
| | method constraint
| target constraint
cardinality
创建 Mock 对象
def subscriber = Mock(Subscriber)
def subscriber2 = Mock(Subscriber)
Subscriber subscriber = Mock()
Subscriber subscriber2 = Mock()
注入 Mock 对象
class PublisherSpec extends Specification {
Publisher publisher = new Publisher()
Subscriber subscriber = Mock()
Subscriber subscriber2 = Mock()
def setup() {
publisher.subscribers << subscriber // << is a Groovy shorthand for List.add()
publisher.subscribers << subscriber2
}
调用频率约束(cardinality)
1 * subscriber.receive("hello") // exactly one call
0 * subscriber.receive("hello") // zero calls
(1..3) * subscriber.receive("hello") // between one and three calls (inclusive)
(1.._) * subscriber.receive("hello") // at least one call
(_..3) * subscriber.receive("hello") // at most three calls
_ * subscriber.receive("hello") // any number of calls, including zero
// (rarely needed; see 'Strict Mocking')
目标约束(target constraint)
1 * subscriber.receive("hello") // a call to 'subscriber'
1 * _.receive("hello") // a call to any mock object
方法约束(method constraint)
1 * subscriber.receive("hello") // a method named 'receive'
1 * subscriber./r.*e/("hello") // a method whose name matches the given regular expression (here: method name starts with 'r' and ends in 'e')
参数约束(argument constraint)
1 * subscriber.receive("hello") // an argument that is equal to the String "hello"
1 * subscriber.receive(!"hello") // an argument that is unequal to the String "hello"
1 * subscriber.receive() // the empty argument list (would never match in our example)
1 * subscriber.receive(_) // any single argument (including null)
1 * subscriber.receive(*_) // any argument list (including the empty argument list)
1 * subscriber.receive(!null) // any non-null argument
1 * subscriber.receive(_ as String) // any non-null argument that is-a String
1 * subscriber.receive(endsWith("lo")) // any non-null argument that is-a String
1 * subscriber.receive({ it.size() > 3 && it.contains('a') })
// an argument that satisfies the given predicate, meaning that
// code argument constraints need to return true of false
// depending on whether they match or not
// (here: message length is greater than 3 and contains the character a)
Stub 打桩
Stubbing 是让协作者以某种方式响应方法调用的行为。在对方法进行存根化时,不关心该方法的调用次数,只是希望它在被调用时返回一些值,或者执行一些副作用。
subscriber.receive(_) >> "ok"
| | | |
| | | response generator
| | argument constraint
| method constraint
target constraint
如:subscriber.receive(_) >> "ok" 意味,不管什么实例,什么参数,调用 receive 方法皆返回字符串 ok。
返回固定值
使用 >> 操作符,返回固定值。
subscriber.receive(_) >> "ok"
返回值序列
返回一个序列,迭代且依次返回指定值。如下所示,第一次调用返回 ok,第二次调用返回 error,以此类推。
subscriber.receive(_) >>> ["ok", "error", "error", "ok"]
动态计算返回值
subscriber.receive(_) >> { args -> args[0].size() > 3 ? "ok" : "fail" }
subscriber.receive(_) >> { String message -> message.size() > 3 ? "ok" : "fail" }
产生副作用
subscriber.receive(_) >> { throw new InternalError("ouch") }
链式响应
subscriber.receive(_) >>> ["ok", "fail", "ok"] >> { throw new InternalError() } >> "ok"
结语
本文介绍了单元测试的基础知识,和Spock的一些用法。使用Spock,可以享受到groovy脚本语言的方便、一站式的测试套件,写出来的测试代码也更加优雅、可读。
但是这只是第一步,学会了如何使用一个测试框架,只是初步学会了“术”而已,要如何利用好Spock,需要很多软性方面的改变,比如如何写好一个测试用例,如何渐进式地去重构代码和写出更易测试的代码,如何让团队实行TDD等等。


